SCIM with Okta
This page covers configuring Okta as your SCIM client to provision users, groups, and licenses into LocalStack. Before starting, make sure you’ve completed the steps in the SCIM overview to enable SCIM and obtain the SCIM Base Connector URL and Bearer Auth Token from the LocalStack web app.
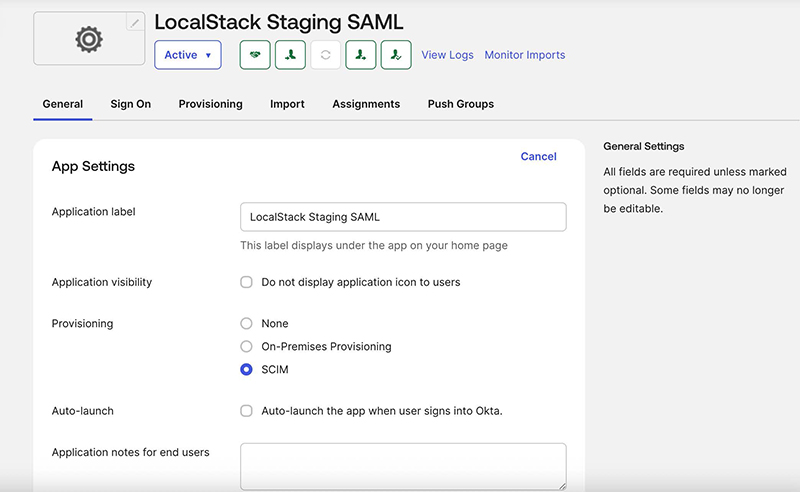
Configuring SCIM with Okta
Section titled “Configuring SCIM with Okta”Use the following steps to configure SCIM Base Connector URL and Bearer Auth Token:
- Select your application — Go to Applications → Applications and select the application you want to enable SCIM provisioning for.
- Navigate to Provisioning settings — In the application settings, go to the Provisioning tab and click Integration or Edit (wording may vary).
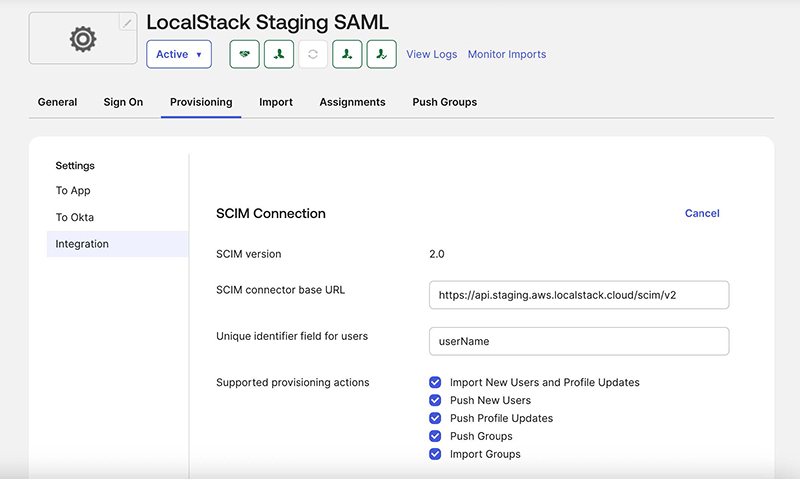
- Enter the SCIM connection details:
- SCIM connector base URL: Paste the SCIM Base Connector URL from the LocalStack SCIM configuration panel.
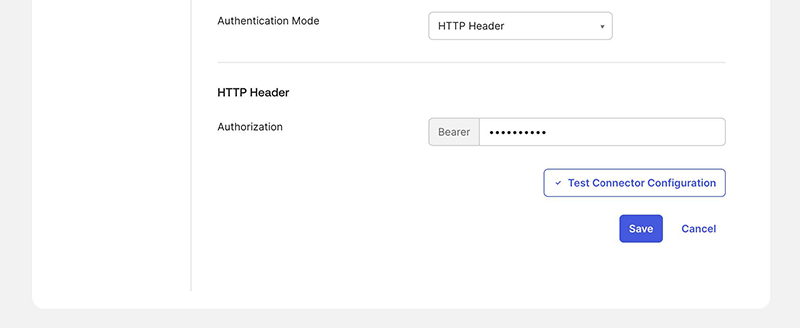
- Authentication Mode: Select HTTP Header.
- Bearer Token: Paste the SCIM bearer token from the LocalStack SCIM configuration panel.
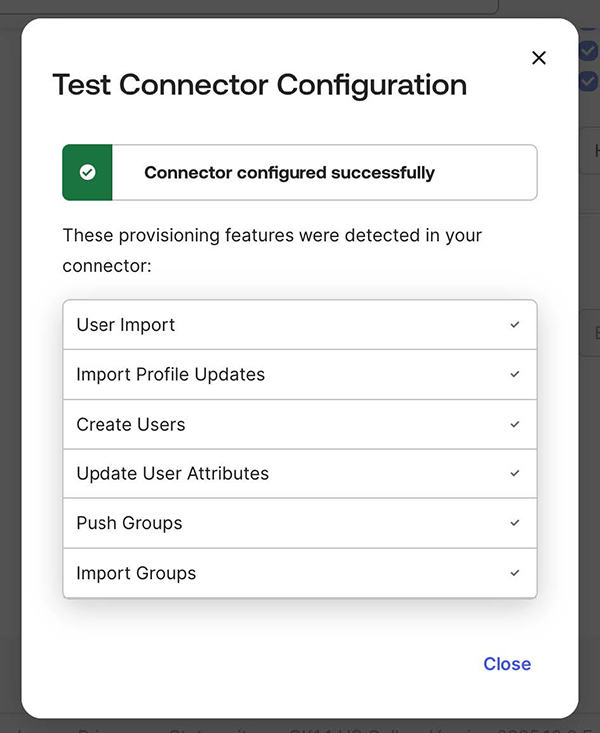
- Test the connection — Click Test Connector Configuration to confirm Okta can connect successfully.
- Enable provisioning features (optional) — Once the connection succeeds, enable the desired provisioning actions (Create Users, Update User Attributes, Deactivate Users) under the To App settings tab. There is no need to enable Sync Password, as SSO does not require a password.
- Save — Save and apply the integration settings.
User Management
Section titled “User Management”Provisioning Individual Users
Section titled “Provisioning Individual Users”LocalStack supports full provisioning and deprovisioning of individual user accounts via SCIM.
- In the Okta Admin Console, go to your application and click the Assignments tab.
- Select Assign → Assign to People.
- Search for and select the users you want to provision, then click Assign and Done.
- Okta will automatically send a SCIM request to LocalStack to create the user account. The user will be visible in LocalStack and their account details will sync from Okta.
Updating User Accounts
Section titled “Updating User Accounts”Changes to user attributes (first name, last name, email) in Okta are automatically pushed to LocalStack via SCIM while the integration is active.
Deprovisioning Users
Section titled “Deprovisioning Users”- In Okta, go to your application’s Assignments tab.
- Find the user you want to remove and click Remove next to their name.
- Confirm the action.
Okta will send a SCIM deprovisioning request and the user will be removed from LocalStack.
Provisioning Groups of Users
Section titled “Provisioning Groups of Users”Groups in Okta can be used to provision multiple users to LocalStack at once.
Assigning a Group
Section titled “Assigning a Group”- In the Okta Admin Console, go to your application and click the Assignments tab.
- Select Assign → Assign to Groups.
- Search for and select the groups you want to provision, then click Assign and Done.
Okta will send a SCIM request to LocalStack to create a user account for each member of the group. Changes to a group’s membership in Okta are automatically pushed to LocalStack via SCIM.
Deprovisioning a Group
Section titled “Deprovisioning a Group”- In Okta, return to your application’s Assignments tab.
- Find the group and click Remove next to its name.
- Confirm the action.
Okta will send a SCIM request to remove the group’s users from LocalStack. Users who were provisioned solely through this group assignment will also be deprovisioned.
Migrating an Existing OpenID Connect or SAML Application
Section titled “Migrating an Existing OpenID Connect or SAML Application”If you have an existing OIDC or SAML app in Okta that already has SSO users assigned, follow these steps to add SCIM provisioning:
-
On the General tab of your Okta application, set Provisioning to SCIM.
-
Go to the Provisioning tab and click Edit to configure the SCIM connection:
- SCIM connector base URL: Paste the URL from LocalStack.
- Unique identifier field for users: Enter
userName(the Okta default). - Supported provisioning actions: Enable all available options.
-
Select HTTP Header as the Authentication Mode and paste the Bearer token from the LocalStack SCIM configuration panel. Click Save.
-
After a successful connection test, go to the To App tab, click Edit, and enable Create Users, Update User Attributes, and Deactivate Users. Save your changes.
-
Click the Assignments tab. Okta will show error messages for users who were assigned before provisioning was enabled. Click Provision User and confirm the action to sync all existing users. If the task fails, you can retry it under Dashboard → Tasks.

-
After syncing completes, refresh the page — the error messages should be gone and all users will be fully managed via Okta SCIM.
Role Management
Section titled “Role Management”LocalStack workspace roles (admin and member) are assigned to users by pushing SCIM groups whose name identifies the target role. The role groups themselves do not need to exist in LocalStack before the push — they are synthetic SCIM groups keyed off the displayName.
Group Name Convention
Section titled “Group Name Convention”Role groups are matched by displayName using a case-insensitive substring check:
- Any group whose name contains
admin→ admin role group - Any group whose name contains
member→ member role group
All of the following are valid names for the admin role group:
LocalStack-AdminLocalStack-Admins-Prodengineering-admins
The first time you push a role group from Okta, LocalStack persists that displayName so subsequent GET responses to your IdP reflect the name you sent. You can also rename the group later via SCIM and LocalStack will track the rename.
Creating and Pushing a Role Group in Okta
Section titled “Creating and Pushing a Role Group in Okta”-
Create a new Okta group whose name contains either
Admin(for the admin role) orMember(for the member role). For example:LocalStack-AdminorLocalStack-Member. -
Add users to the group (users must already be assigned to the LocalStack SCIM application).
-
In your application, go to the Push Groups tab.
-
Push the group to LocalStack via SCIM.
-
Once synced, LocalStack will assign the corresponding role to all members of the group.

Moving a User Between Roles
Section titled “Moving a User Between Roles”To change a user’s role from member to admin (or vice versa):
- Remove the user from their current role group in Okta.
- Add them to the target role group.
Perform these operations as a single atomic action where possible. Adding a user to the new role group while they are still in the old one will return a 409 conflict.
Last-Admin Protection
Section titled “Last-Admin Protection”LocalStack will reject any SCIM request that would leave the workspace without an admin. If you attempt to remove the only admin from the admin role group, the request fails with 409 Cannot remove the last workspace admin. Assign another admin in LocalStack first, then retry the removal.
License Management
Section titled “License Management”Licenses are assigned to users by pushing specifically named SCIM groups that correspond to your LocalStack subscriptions.
Group Name Format
Section titled “Group Name Format”License group names follow this format:
{PLAN}-{EMULATOR}-{SUBSCRIPTION_ID}For example: Enterprise Plan-AWS-sub_1RqpMYGCs0LNOzY9UszOGJkL
The exact group name for each subscription is displayed in the SCIM configuration panel in the LocalStack web app. Use the subscription dropdown to select the plan you want to manage, and the correct group name will be shown for you to copy.
Creating and Pushing a License Group in Okta
Section titled “Creating and Pushing a License Group in Okta”- Create a new Okta group named exactly as shown in the LocalStack SCIM configuration panel.
- Add users to the group (users must already be assigned to the LocalStack SCIM application).
- In your application, go to the Push Groups tab.
- Push the group to LocalStack via SCIM.
- Once synced, LocalStack will recognize the group and assign the corresponding license to all members.
Migrating Users with Existing Licenses
Section titled “Migrating Users with Existing Licenses”If your organization already has users with assigned licenses and you want to manage them through SCIM:
- Create a license group in Okta with the correct name.
- Add it to the application via the Push Groups tab.
- Add the existing licensed users to that group through the application. Once added, they will be automatically synced (Push Status becomes Active) and managed through SCIM going forward.